Sidekick Quilt
Lately I’ve been into finding the most different-looking quilts there are. Something I’ve never done before, and definitely something I’ve never seen.
I found the perfect project for people like me who need a new quilting love in their life… the sidekick!
Jenny Doan from Missouri Star Quilt Company is back again with another great tutorial. This one is called the “sidekick,” and it’s absolutely stunning. Not only that, it’s easy to make too!

Creating The Sidekick
This block is a bit more complicated than other blocks Jenny has done in the past, but it’s more than worth it once you see the finished product!
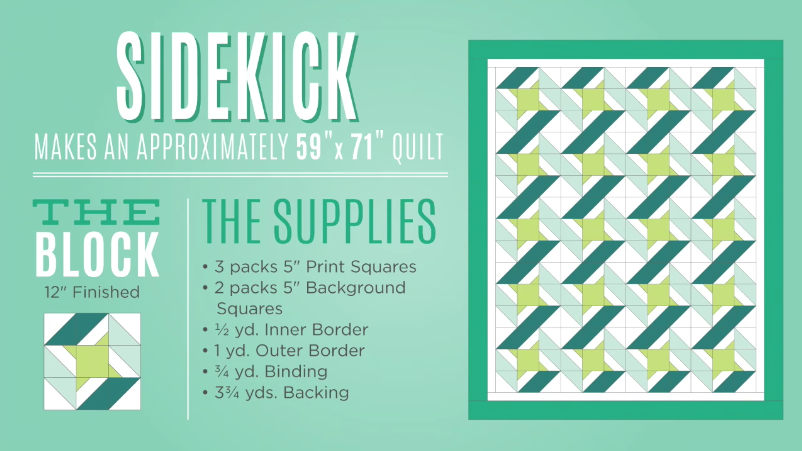
9 small blocks form the final large block you see in the quilt. There are 3 types of little blocks you’ll need to cut in order to get the final product.
These 3 blocks are solids, half square triangles, and half square triangles with a colored corner on the background fabric side. All of these blocks are super easy to make.
For your middle block, you’ll just cut your 5″ printed square down to 4.5″. You’ll cut another one into four 2.5″ squares to create the colored corner.
Now, make 8 half square triangles, 4 of one color with the background and 4 of the other. You’ll trim those to make 4.5″ once you’ve sewn them all up.
Now, for 4 of those half square triangles, two of each color, you’ll line up your 2.5″ squares with the corner of just background fabric. Right sides together, sew this on diagonally down the middle.
Trim and press this and you’ll have your third and final block piece! Now arrange them like Jenny shows, and you’re finished with your block. Easy as pie!
Watch the tutorial below for more tips and tricks. It really is super simple. You’ll love making it!


